
How I've hoped to make this more helpful for both of us, is by meticulously collecting and cataloguing my results.
So here is my methodology. I'd suggest that you follow my procedure very closely to reproduce any of the results you see here. I'm finding lighting is composed of dozens of variables, and so like a good science experiment I'm isolating each set one at a time to see what they do. So please bare with me as over the next few days (possibly weeks, or worse case scenario months) as I attack each variable on its own.
Here I'm testing a Three-point lighting system. To reverse engineer this setup you're going to need a circular array of three lights (whether they be spotlight, blub, or distant is up to you... though I've personally gone with distant). These lights should be aligned 120 degrees apart from one another, and all pointing towards the centre of the circle. Mine were pointing at the ground from the sky at a 45 degree angle (I will be running a test/tutorial on changing all the angles and positions mentioned here in later experiments).
Once you're lights are setup, each will have their own settings. These include the key light which will have the highest lighting and shadowing rating (in the case of below both these settings were 100%), and thus be the main light source of the scene. Next is the fill light that will have a halved value on lighting intensity, but in my case a normal shadow strength. Lastly the backlight will be the weakest with a 1/3 to 1/4 strength in lighting and again normal shadow. For this specific tutorial I've arranged these in clockwise order of one another.
Lighting colour (critical to some of my future tests) had the Key light with a cooler colour (a near white blue in this case), the fill with a warmer (near white yellow), and backlight with a neutral (near white gray).
I grouped this three-point lighting system which in effect (with centre point truly in the centre) turned these lights into an imaginary circle (basically bombarding my scene with light from all directions, but of varying power and strengths). For each test of my lighting I rotated this group 45 degrees per render. This way I could see what the three-point lighting was doing from roughly every possible position of setup.
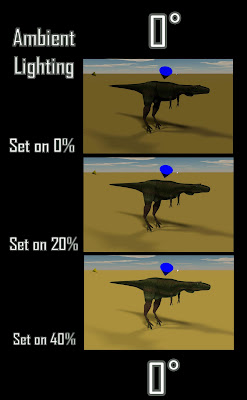
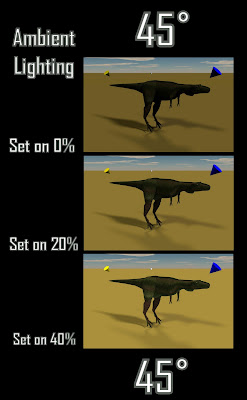
Today's test variable is the ambient lighting within the scene. This is of course a lighting source removed from those I can create or move. I wanted to see what effect normal, zero, or well above average would have on a basic three-point system.
I had a few surprises in the zero and cranked up tests, but normal ambiance proved to be nice and predictable. So I share with you the visual results of my labours. I offer no commentary yet, as this is just one of many tests I plan on running. I'm sure once I've dived into lighting as a whole a bit more I will return with some points and tips, but for now again we're both learning and seeing these together...
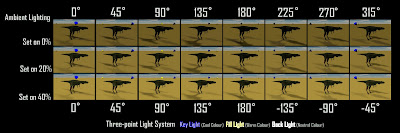 Here are all the results combined (hopefully blogger allows us to click to enlarge it... if not I'll upload it to my flickr account and link it tomorrow). Below I've broken this down by the three-points alignment around the unmoving Dinosaur and camera. The light group starts at my 0 degree mark and goes around full circle from there.
The floating cones you see in these pictures are stand in proxies for the lights themselves so you can see roughly where they are and how I've set them up (as mine are distant lights their exact position isn't important. For bulb or spotlights you will need to change their position to much further away from objects in a scene).
The blue cone is the key light, the yellow is the fill, and the white is the backlight (I choose these colours at the time as they were a visual representation of what colours I'd made the lights themselves, but in later experiments I realized after the fact I stuffed up changing these with my changes in the lights colour... BEEP!)


5 comments:
Ambient is used in varying ways in 3D: as simple "everywhere" light, the way I also use it. Is that what it is in Carrera? It looks it, but I'm not sure.
I'll have to try to sum up my pointers in a post of my own at drip.
In short, I don't think your 3 point lighting system is all too helpful for outside environments. It's used mostly (and overused) as a one-all solution for studio lighting.
Second, I recommend making your dino white with about 12% specularity & 80% diffuse color, about 50% roughness. Then you can judge the lighting effects much better.
Those spec and roughness values are generally skin-like, with gloss at about 8%.
http://www.drip.de/?p=1600
Hey Craig, let me know if this helps.
David-
I agree that in the long run this 3 point lighting system is not going to solve my lighting woes. However in the short term I'm being clinical in exploring and examining all the possible characteristics of simple lighting theory.
Up until now I've only bothered to learn the technical attributes of my lighting tools, and so I know HOW they work. I've never bothered to learn how to MAKE them work, with practical theory.
Since I'm putting so much work into recording the results of my various tests (so I can go back and easily remember what each factor did) I figured I'd put them out there should anyone else look for this sort of break down on lighting variables.
So don't take this exactly as my solution to lighting, more the means and journey to get there.
There are probably going to be 10-20 of these studies on the various possible variables. I can't get over how many different individial means of modifying lights they are. Removed from the technical settings. So I have a lot of play and learning to do.
One feature of Carrara I do like is that ambient light is built into every scene as a controllable factor. It is a very simple tool with only a strength control (out of 100%) and colour filter control (I usually leave it white, but my post today is my experiment with new filter colours).
This light is univeral emitted in all possible directions from no direct or distant source, but doesn't create or cast shadows. In other words the perfect ambient light.
Having seen your post I do like the white dino approach too. Sadly the specific setting names don't line up between Carrara and your software.
I was trying these renders with my dino fully textured just to see what effect colour filters specifically had on a "final" product. I will probably visit shadow quality issues with white dinos as per your example (did I ever thank you for the test grid layout you demonstrated last year on your prosauropod).
I found your post useful for considering how bounce light does or doesn't not work in Carrara (I'm not sure yet if it does bonce from a main lights or if I'll have to manually set up a "fake" boune light). As I'm only part way into my lighting study I think that post will have a bigger impact the more I progress.
MY EYES!
Craig, while I admire your ethic and commitment, to me it seems you're doing a lot of subtle variations on the same set up.
I know you're trying to be analytical but it looks like you've skipped the most important step: *observation*.
Look at natural settings outdoors, the garden, wildlife photos.
Take a few minutes to work out what the light is doing.
Where's the main light source?
Look at what the shadows are doing, are they sharp or diffuse?
Is there color and light bleeding from one area to another?
How do the properties of the ground affect the light reflecting off it on to other things?
How does the time of day and cloud cover affect the way the light behaves?
Make a sketch or diagram, take photos.
Do this half a dozen times.
*Then* go inside, switch on the infernal machine and see if you can replicate a particular time of day or situation using the simplest set up possible.
Post a Comment