So I've been having a very interesting last few days.
My hunt for employment had not been going particularly well (thanks in no small part to the American Republican party using the world economies recovery as their play thing!).
The one hope we'd been riding on, was an incredibly lengthy and draw out application for a real teaching position in Hong Kong I started in March. It never panned out. Leaving us without options.
Literally on the day we were starting to give up hope, one of R's contact's in Hong Kong suddenly made a public appeal to any teachers out there who wanted to teach in Hong Kong that there was a sudden job opening at their skool...
So a short story long, I sent my resume off Weds night. Was contacted Friday night, and offered the job. I now leave for Hong Kong tomorrow (Monday Aussie time), and start teaching Thursday.
Why couldn't all job applications work like this?
So I'm moving to Hong Kong, where we'll be for two years at least.
This shouldn't interrupt my online presence too much in the long run. Sadly in the short term I suspect I will be a no show for a week or so. Who knows. Just warning everyone in case you need to contact me.
Expect some posts of the new adventures in Hong Kong (and who knows this might just be enough to reboot start Traum... though I still have a backlog of his finale in NZ)

Aug 28, 2011
Aug 26, 2011
Lighting Challenge 2
It has been a really stressful and tense 2 days, as we're waiting back on a very key job application. I've ended up unable to focus on anything too thought intensive. Making my lighting challenge a perfect thing to run in the background.
At moment I'm only really playing with individual key lights, so they are not too time (or brain consuming) on my part. Rendering times on the other hand are incredibly long. So once I make the change to the light I can leave it for 30 minutes while it renders.

The changes are subtle, and some are not enough to fix the problems. I'll go through each element to make it more clear.
I differentiated the source lights on nearly every component in this scene. So all like things in this rendition have a unique source light targeting only them (which caused me some major issue in sorting out shadows).
The Gorgosaurus has a slight blue gel on it. I'm happy with this initial setup. I plan on following more of David's suggestions with him.
The Styracosaurs have a strong red gel on their source light which is helping bring them out of the background, but not enough. They are going to need more light tweaking.
The plants have a mid yellow filter, and this has brought out the details on them while not drastically brightening them. I'm especially happy with how the Gingko leaves now pop out from each other. I'll be probably leaving this lighting the same, and leave the forest alone from here on here.
 This is the old version from my last post so you can compare. There are differences, but sadly not as pronounced as I had wanted.
Aug 24, 2011
Gallery Coming Up...
Quick aside from my lighting experinment... As we have an ART Evolved gallery coming up afterall.
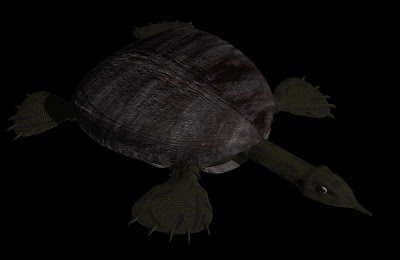 Here is my soft shelled turtle so far. The only thing I'm even remotely happy with is the shell. Sadly I don't have a high enough resolution picture of a turtle's shell to make the texture as good as I wanted.
Here is my soft shelled turtle so far. The only thing I'm even remotely happy with is the shell. Sadly I don't have a high enough resolution picture of a turtle's shell to make the texture as good as I wanted.
The tissue needs a lot of work in the shader. The model also needs some serious TLC.
So I'll be bashing away on him on the side...
Aug 23, 2011
Lighting Challenge Part 1
I FINALLY got to the lighting part of my lighting challenge.
Entering into this task, I had a fantastic head start due to advise I have been receiving. I just wanted to say thank you again to the talented and supportive people taking their time to help me out!
I've only really started on lighting the Gorgosaurus. It is a nice start (especially compared to the "flat" version of yesterday, below). I have a lot to do still...
The biggest issue is the Styracosaurs are now too camouflaged. The plants are too black and their detail is obscured is the last issue.
 Still once more it is a huge improvement over this!
Entering into this task, I had a fantastic head start due to advise I have been receiving. I just wanted to say thank you again to the talented and supportive people taking their time to help me out!

I've only really started on lighting the Gorgosaurus. It is a nice start (especially compared to the "flat" version of yesterday, below). I have a lot to do still...
The biggest issue is the Styracosaurs are now too camouflaged. The plants are too black and their detail is obscured is the last issue.
Still once more it is a huge improvement over this!
Aug 22, 2011
Lighting Challenge... Prelighting 4
Between job applications, an online course I'm taking, and of course bird watching (now narrowing in on my local Kookaburras exact behaviour... updates soon) I managed to sneak in a bit more work on my lighting (scene creation?) challenge piece.
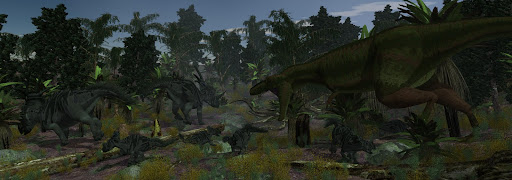
I was able to litter the forest floor with more "stuff". I like it, but I'm going to need more. Have to fidget with some smaller stuff (dead leaves and branches) to capture the true feeling of a forest.
I also added a thin fog to the forest to help decamouflage my Gorgosaurus (man I can't get over how good that cameo is... unfortunately it is too good in this case :P). Hat tip to Matt and David for pointing me in the mist/fog direction. It'll need some adjustment and tweaking, but I think for a first pass this looks not too bad!
I dare say beyond the forest litter needed, I might have something ready for a proper lighting experiment now. What do you all think?
Aug 18, 2011
Lighting Project... Prelights 3
The next steps in my lighting challenge (though I'm starting to think of it more as a scene challenge... I'm pushing every single one of my skills, except those with the Dinosaurs (I've had plenty of practise with them).
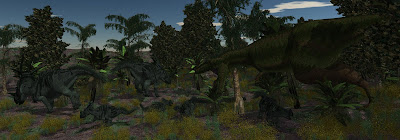 Today was plant day (the first of many I'm sure). Here is where I'm at so far. I'm pleased as punch with a few of my plants, and quite underwhelmed by others. I'm finding getting realistic leaf colours difficult (mind you the lighting... once I FINALLY get to it) might help out here.
So how do you make a distribution of plants like this. Well you can either manually duplicate and place every single plant, or take a short cut. With about 600 plants in here (most of them the shrubs) I took the short cut.
This time saver is a surface replicator. Though after I take your through the process it turns out to almost be more work :P
I have plenty of experience with replicators as they are how I make my feather setups. Plants are quite different though. To get better result you need to target where your plants pop up.
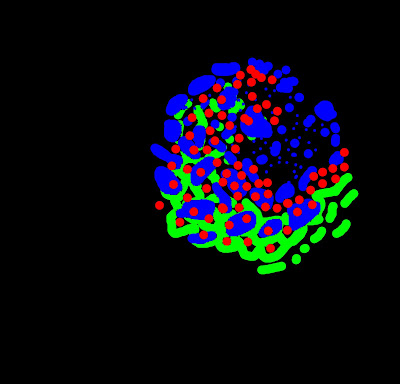
Next in your photoshopish program draw out the plots for your plant layout. Each of those painted areas is the portions of my landscape where certain plants are allowed to replicate within the replicator. The Green is the large trees, red the medium ferns, blue is the shrubs and smaller plants.
 Depending on the topography of your landscape, your deployment pattern might or might not line up with your isometric map. In this case I was lucky, and it was about 95% on the spot.
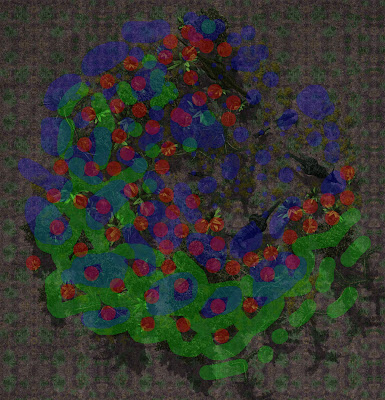 You can see the 5%ish miss with this attempt to line the pattern up with the plants themselves.
So from here I will probably expand the 3D plants one more layer. From there I'll set up some 2D proxies to make the rest of the forest. While the replicator procedure is the same (simpler in fact!), I'm not sure how to approach creating the pictures for the proxies. Do I wait till I get the lighting right to render these, or do I do that now in this current light, and hope the new lighting effects a picture the same way it does the 3D plant.
Today was plant day (the first of many I'm sure). Here is where I'm at so far. I'm pleased as punch with a few of my plants, and quite underwhelmed by others. I'm finding getting realistic leaf colours difficult (mind you the lighting... once I FINALLY get to it) might help out here.
So how do you make a distribution of plants like this. Well you can either manually duplicate and place every single plant, or take a short cut. With about 600 plants in here (most of them the shrubs) I took the short cut.
This time saver is a surface replicator. Though after I take your through the process it turns out to almost be more work :P
I have plenty of experience with replicators as they are how I make my feather setups. Plants are quite different though. To get better result you need to target where your plants pop up.
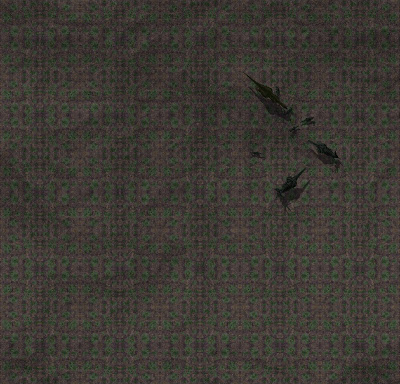
To line up your rough target I suggest setting up an Isometric camera directly above your landscape. Render out a map of your scene like this. Keep your subjects in view, so you know where you need to place your plants around.
Next in your photoshopish program draw out the plots for your plant layout. Each of those painted areas is the portions of my landscape where certain plants are allowed to replicate within the replicator. The Green is the large trees, red the medium ferns, blue is the shrubs and smaller plants.
 Depending on the topography of your landscape, your deployment pattern might or might not line up with your isometric map. In this case I was lucky, and it was about 95% on the spot.
You can see the 5%ish miss with this attempt to line the pattern up with the plants themselves.
Depending on the topography of your landscape, your deployment pattern might or might not line up with your isometric map. In this case I was lucky, and it was about 95% on the spot.
You can see the 5%ish miss with this attempt to line the pattern up with the plants themselves.
So from here I will probably expand the 3D plants one more layer. From there I'll set up some 2D proxies to make the rest of the forest. While the replicator procedure is the same (simpler in fact!), I'm not sure how to approach creating the pictures for the proxies. Do I wait till I get the lighting right to render these, or do I do that now in this current light, and hope the new lighting effects a picture the same way it does the 3D plant.
Aug 17, 2011
The Lighting Challenge... Pre-Lighting 2
 Here is the updated version of my new portfolio piece. Still no lighting that alone much else. I have added the sky, ground, and I'm sure you're noticing a lot more Dinosaurs.
I decided a bit more chaos from the Ceratopsian end was needed to communicate the exact idea
of loose social groups I'm going for. Sure they move together, but the instant trouble rears its head their in it for themselves.
Aug 15, 2011
The Lighting Challenge... Pre-lighting 1
So my lighting experts have challenged me to test lighting within a scene. Who am I to argue with them? So here I go.
I figure I can make a nice portfolio piece along the way. I will be continuing with my previous lighting variable experiments (well really just posting them, as I've already done most of the work anyways... having taken the effort to render them all I figure I'd finish up my public documentation of the results to make it worth my time).
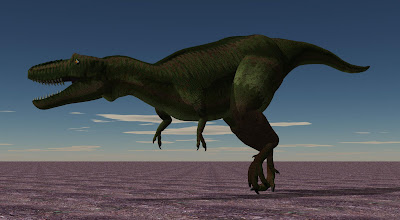
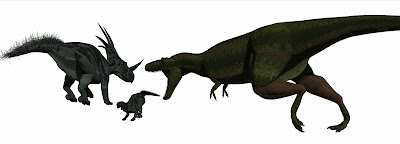 So here is step one of my lighting test ground so far. Of course this is just the Dinosaurs so far. In the final piece there will be ground, plants, and of course LIGHTING! Elements like camera angle, the orientation and position of the Dinosaurs, and even number of Dinosaurs can all be changed. This is the point from which I am planning to build the scene up, and I will take you along for the process.
The scene will be a Gorgosaurus ambushing a family group of Styracosaurs. Unlike most pieces that see such an event playing out as the Tyrannosaurid versing an adult Ceratopsian, I don't want my Gorgosaurus in this unlikely duel. I just don't see how this would be beneficial for the Tyrannosaur (that alone survivable most of the time). To me they'd be going for sick adults when available (which won't always be guaranteed), but usually a smaller young member of a herd.
I'm also playing with less popular social theories than those that are usually presented. While it is likely Ceratopsian and Tyrannosaurids lived in social situations some of the time, there is no reason to believe this was always the case or the norm. If anything recent (more cautioned) research is starting to indicate while Dinosaurs possessed some complicated social behaviour, they were probably not as complex as modern mammals. Which implies there were many times social interactions were rarer or more volatile than the original Dino renaissance envisioned.
I've been quite interested in how the massive bonebeds in Alberta are interpreted as massive seasonal migrations by Brinkman, Ryan, and Eberth (east to west rather than north south if you're wondering). They present a scenario in which the Ceratopisans were living most of the time along the coast and would seasonally move inland. The reasons are not determinable at moment, but food availability or breeding seem the most likely. To me it calls into question just how concrete their sociality really was, as there is nothing to say the giant herds were full time. At the end of the migration is makes more sense the animals would disperse.
So to demonstrate this casual sociality I have the adult bolting at the first sign of danger. I've heard some interesting unpublished research suggesting adult (Ornithischian) Dinosaurs might not have been as supportive of parents as we've been thinking. This might be a bit extreme, but who can prove me wrong?
As for the Gorgosaurus I'm debating whether I want it with a hunting partner. I'm more inclined to think mother Tyrannosaurids would tolerate their kids hanging around rather than another adult. Their bird relatives, but very primitive ones.
Anyways thoughts or commentary?
I figure I can make a nice portfolio piece along the way. I will be continuing with my previous lighting variable experiments (well really just posting them, as I've already done most of the work anyways... having taken the effort to render them all I figure I'd finish up my public documentation of the results to make it worth my time).
 So here is step one of my lighting test ground so far. Of course this is just the Dinosaurs so far. In the final piece there will be ground, plants, and of course LIGHTING! Elements like camera angle, the orientation and position of the Dinosaurs, and even number of Dinosaurs can all be changed. This is the point from which I am planning to build the scene up, and I will take you along for the process.
The scene will be a Gorgosaurus ambushing a family group of Styracosaurs. Unlike most pieces that see such an event playing out as the Tyrannosaurid versing an adult Ceratopsian, I don't want my Gorgosaurus in this unlikely duel. I just don't see how this would be beneficial for the Tyrannosaur (that alone survivable most of the time). To me they'd be going for sick adults when available (which won't always be guaranteed), but usually a smaller young member of a herd.
I'm also playing with less popular social theories than those that are usually presented. While it is likely Ceratopsian and Tyrannosaurids lived in social situations some of the time, there is no reason to believe this was always the case or the norm. If anything recent (more cautioned) research is starting to indicate while Dinosaurs possessed some complicated social behaviour, they were probably not as complex as modern mammals. Which implies there were many times social interactions were rarer or more volatile than the original Dino renaissance envisioned.
I've been quite interested in how the massive bonebeds in Alberta are interpreted as massive seasonal migrations by Brinkman, Ryan, and Eberth (east to west rather than north south if you're wondering). They present a scenario in which the Ceratopisans were living most of the time along the coast and would seasonally move inland. The reasons are not determinable at moment, but food availability or breeding seem the most likely. To me it calls into question just how concrete their sociality really was, as there is nothing to say the giant herds were full time. At the end of the migration is makes more sense the animals would disperse.
So to demonstrate this casual sociality I have the adult bolting at the first sign of danger. I've heard some interesting unpublished research suggesting adult (Ornithischian) Dinosaurs might not have been as supportive of parents as we've been thinking. This might be a bit extreme, but who can prove me wrong?
As for the Gorgosaurus I'm debating whether I want it with a hunting partner. I'm more inclined to think mother Tyrannosaurids would tolerate their kids hanging around rather than another adult. Their bird relatives, but very primitive ones.
Anyways thoughts or commentary?
Lighting Blooper
Had a funny mistake today while playing with lights. Thought you might kick a giggle out of it.
 I was starting to setup some forest and lights for this fellow. Before adding trees I thought it might be fun to add some light cone effects (god rays in real life situations). I probably should have added the trees before hand to proper see how the effect was going, but I've played with light cones a lot in my water scenes so I know how they work. So I set up a quick light cone, but forgot to reposition the spot light (which was way too close to the model and ground). Giving me...
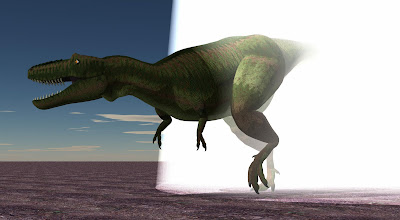 A Tyrannosauriod beaming down to Saskatchewan (For you non-Canadians there is a joke about our middle province being so flat you can see your dog running away for days... Much like the landscape my Gorgosaurus finds itself in right now).
Aug 14, 2011
Fastest Forest
After a very informative discussion with fellow ART Evolved member David Maas I've just launched a major attack on one of my biggest 3D problems. While I can't claim total victory, with David's incredibly useful advice I'm in position to finish off my foe.
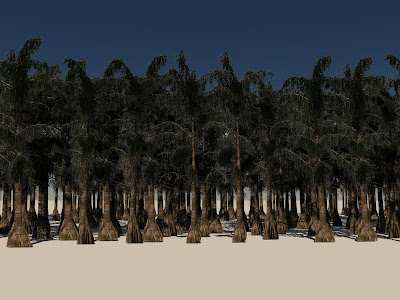
That imaginary enemy. Rendering big dense and realistic CG forests...
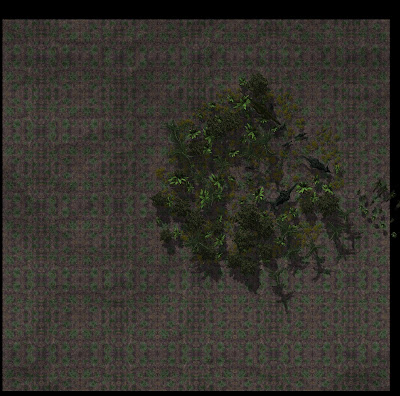
Even after upgrading my computer's RAM, this task has been killing my machine and my efforts. Now with a brilliant suggestion from David, I just rendered this forest in just under 15 minutes (my normal forests, IF they rendered, took well over an hour).
That imaginary enemy. Rendering big dense and realistic CG forests...
Even after upgrading my computer's RAM, this task has been killing my machine and my efforts. Now with a brilliant suggestion from David, I just rendered this forest in just under 15 minutes (my normal forests, IF they rendered, took well over an hour).
 While it is very rough around the edges, this is of course just a demonstration of the concept.
What is the concept?
The majority of the trees you saw a moment ago were not actually proper 3D models, but rather a CG equivalent of a 2D cardboard cut out. To make them, I rendered the true tree model as a 2D image, than applied it on a plane object, and amped up the alpha setting (which a non-3D person would think of as transparency... but don't get me going on what transparency actually does in 3D...).
Apart from some issues I'm having with the 2D image (it has a white outline due to slight greys around the edges) this looks perfect. I just need to seek out a solution in my graphic editing software (not that that won't be a headache).
Thanks David!
Aug 13, 2011
Australian Animals 2011 (so far...)
Here is a pictorial showcase of the cool wildlife I've been able to spot here in Australia this trip.
I have a slight headache, so I'm going to be light on words here.
 Wattle Bird
 Thornbill
 Splendid Wren
 The most Cormorants I've ever seen swimming in the same spot.
 Australian Robin
 Black Cockatoo.
 Wedge tail Eagle
 Tasmanian Waterhen
 Lots of different Rosellas
 Currawong
 Lots of Kookaburras (funny enough)
 On the mammal front lots of Pademelons
 An Echidna!
 Four wild Wombats all in one day! The only time I've ever seen them in the wild, and it is within 10 hours...

A Gold Tail Possum.

I have a slight headache, so I'm going to be light on words here.
Wattle Bird
Thornbill
Splendid Wren
 The most Cormorants I've ever seen swimming in the same spot.
 Australian Robin
Black Cockatoo.
Wedge tail Eagle
Tasmanian Waterhen
Currawong
Lots of Kookaburras (funny enough)
On the mammal front lots of Pademelons
An Echidna!
Four wild Wombats all in one day! The only time I've ever seen them in the wild, and it is within 10 hours...
Australian Robin
Black Cockatoo.
Wedge tail Eagle
Tasmanian Waterhen
Currawong
Lots of Kookaburras (funny enough)
On the mammal front lots of Pademelons
An Echidna!
Four wild Wombats all in one day! The only time I've ever seen them in the wild, and it is within 10 hours...

A Gold Tail Possum.
Got the closest to this little gal in fact.
Kookaburra Field Biology 1
I figured I'd share a few of my ongoing adventures from down here in Australia.
One of my favourite past times (especially down here in Aus) is bird watching. Of all bird types I think my favourite are the Kingfishers, and of those the Kookaburra stand very high on my preferred watching list.
While in previous visits to Aus (all in their summer), the Kookaburras hadn't been the most cooperative. Yes I'd see them, and manage to snap a photo or two, but they usually only stuck around for a few minutes. Part of this was probably due to a more plentiful food supply (the Kookaburra diet has a lot of reptiles on it, which in Tasmania tend to hibernate during the colder months), so they could spare the energy to fly away. Additionally back in those days my cameras only had 4X or 10X zooms, which meant I had to try and get a whole lot closer for pictures and usually ended up scaring them away.
Now in the colder months, where the Kookaburras are reputed stay in one spot to conserve energy and find more elusive meals, and my new 20X zoom camera allowing me to keep a much greater distance I've been able to get a lot more quality Kookaburra time in. I've managed nearly a dozen observations of groups of Kooks for over 10 minutes each.
So here are some of my field observations. These are just my interpretations, and so don't go quoting me as an authority or anything. Think of these as my hypothesises, and only with more observations (aka repetitive data) can I confirm or deny any of this. (I'm also planning on treating myself to Kook expert Sarah Legge's book once I get a job).
Today's is on Kookaburra body language and communication. So based on my observations and reading, Kookaburras live in small family social groups, but are very territorial and aggressive towards Kookaburras of other groups. There photos are all of the same bird until I note otherwise.
 The majority of the time you see a Kookaburra they are somewhere high up with good observation potential (just like most other Kingfishers). These perches can vary but that is my next post...
Most of the time the Kookaburra are in what I'll call their solitary state. It is a good sign there are no other Kookaburras around that the subject is interested in. When they are not concerned about other birds, they sit up straight, have their tail down, and puff their feathers out (especially in this cold winter weather). The feathers around the head are the key indicator of agitation or not. If your Kookaburra has a dome and pronounced sideburns of feather you're looking at a relaxed Kookaburra.
This is not to say it is a truly solitary bird. I've seen many Kookaburras sitting beside each other in this state. It just tells you that there are no rivals nearby, and any close proximity birds are in the same family group.

If the bird gets agitated it will slick its feathers into its body. While the body will loose some of its puff, the head is the telltale area to watch for this bringing of the feathers in. The Kookaburra's head will suddenly become very streamlined with the beak (and you'll realize how much of their typical profile is made up of display feathers). This tells you it has either noticed a territory challenge far off (as Kookaburra's call is loud and travels a great distance), a fellow family member it wishes to call to, or fly away.
If a Kookaburra draws its feathers in, but doesn't call within 5 to 15 seconds, it was (or is) planning to fly away. To tell if the bird is going to call or fly in an agitated state watch the tail in particular, but also posture. If the tail stays down its going to fly. While the tail is the best indicator its stance can also help predict what it is going to do. If the bird stays erect or leans forward again it is probably going to fly.
 If the Kookaburra raises its tail, and aligns its head and body upward it is displaying and might start calling! I've never seen a bird fly immediately from this stance, and it almost always means there are other Kookaburras nearby. Whether they are friendly birds or rivals is very difficult to tell without flight actions (chasing).
Calls come in varying degrees both in volume and body posture. Kookaburras will start a laugh from this display pose, but it isn't not the very loud or raucous call they are famous for.

As they ramp up the volume and get into the laugh they'll tilt their neck right back and bring their body back into an erect state. The mouth will finally visibly open.
Sadly my example bird wouldn't laugh when I was at the optimum angle of the previous photos. So you're probably wanting to see a laugh from a better angle. The next two photos from my 2009 visit give you this view, but are of a different bird (I presume... they were taken only 300 metres from each other).
 Another thing that tends to happen when Kookaburras really start laughing (as opposed to the light call of their display posture) is that every other bird in the general area will gather to the laughing bird(s). Meaning you can get anywhere from two to eight birds (in my experience anyways... I could see a higher maximum, but have never seen it myself).
It is at this point you'll be able to tell if it is a single family group your watching, or rival tribes. If the birds all just sit and call, they're friendly to one another. If they start chasing each other or taking swoops at the calling bird, they are likely rival groups.
 I hope this was interesting to people, and if there are any Kookaburra experts reading this I'd love feedback (whether I'm right or wrong). Again this is just my hypothesis on body language, based on eleven or so close observations.
Aug 11, 2011
Ambient Filters
Here comes round 2 of my exploration of ambient lighting. This time I'm taking a stab at the colouration of the filter on the ambient light.
Like before I am only exploring the effect of one variable out of dozens possible in lighting settings and rigs. For my full setup methodology read at the bottom (I put it to the bottom as it is a repeat of my previous post, and I don't wish to bore those who have read it before).
For this test I took my ambient light and tried 5 different colour filters on its light. These were extreme warm (a strong bright yellow), warm (near white yellow), neutral (white), cool (near white blue), and extreme cool (strong bright blue). All these were set at 20% strength. If you want to see the effect of changing the lighting strength check out my last post.
Here are the results. I will be doing some commentary on these soon once I've had a chance to fully understand what I've discovered :P Again stumble through experimentation, we take conclusions if and when they pop up.


So here is my methodology. I'd suggest that you follow my procedure very closely to reproduce any of the results you see here. I'm finding lighting is composed of dozens of variables, and so like a good science experiment I'm isolating each set one at a time to see what they do. So please bare with me as over the next few days (possibly weeks, or worse case scenario months) as I attack each variable on its own.
I'm testing a Three-point lighting system. To reverse engineer this setup you're going to need a circular array of three lights (whether they be spotlight, bulb, or distant is up to you... though I've personally gone with distant). These lights should be aligned 120 degrees apart from one another, and all pointing towards the centre of the circle. Mine were pointing at the ground from the sky at a 45 degree angle (I will be running a test/tutorial on changing all the angles and positions mentioned here in later experiments).
Once you're lights are setup, each will have their own settings. These include the key light which will have the highest lighting and shadowing rating (in the case of below both these settings were 100%), and thus be the main light source of the scene. Next is the fill light that will have a halved value on lighting intensity, but in my case a normal shadow strength. Lastly the backlight will be the weakest with a 1/3 to 1/4 strength in lighting and again normal shadow. For this specific tutorial I've arranged these in clockwise order of one another.
Lighting colour (critical to some of my future tests) had the Key light with a cooler colour (a near white blue in this case), the fill with a warmer (near white yellow), and backlight with a neutral (near white gray).
I grouped this three-point lighting system which in effect (with centre point truly in the centre) turned these lights into an imaginary circle (basically bombarding my scene with light from all directions, but of varying power and strengths). For each test of my lighting I rotated this group 45 degrees per render. This way I could see what the three-point lighting was doing from roughly every possible position of setup.
Like before I am only exploring the effect of one variable out of dozens possible in lighting settings and rigs. For my full setup methodology read at the bottom (I put it to the bottom as it is a repeat of my previous post, and I don't wish to bore those who have read it before).
For this test I took my ambient light and tried 5 different colour filters on its light. These were extreme warm (a strong bright yellow), warm (near white yellow), neutral (white), cool (near white blue), and extreme cool (strong bright blue). All these were set at 20% strength. If you want to see the effect of changing the lighting strength check out my last post.
Here are the results. I will be doing some commentary on these soon once I've had a chance to fully understand what I've discovered :P Again stumble through experimentation, we take conclusions if and when they pop up.

So here is my methodology. I'd suggest that you follow my procedure very closely to reproduce any of the results you see here. I'm finding lighting is composed of dozens of variables, and so like a good science experiment I'm isolating each set one at a time to see what they do. So please bare with me as over the next few days (possibly weeks, or worse case scenario months) as I attack each variable on its own.
I'm testing a Three-point lighting system. To reverse engineer this setup you're going to need a circular array of three lights (whether they be spotlight, bulb, or distant is up to you... though I've personally gone with distant). These lights should be aligned 120 degrees apart from one another, and all pointing towards the centre of the circle. Mine were pointing at the ground from the sky at a 45 degree angle (I will be running a test/tutorial on changing all the angles and positions mentioned here in later experiments).
Once you're lights are setup, each will have their own settings. These include the key light which will have the highest lighting and shadowing rating (in the case of below both these settings were 100%), and thus be the main light source of the scene. Next is the fill light that will have a halved value on lighting intensity, but in my case a normal shadow strength. Lastly the backlight will be the weakest with a 1/3 to 1/4 strength in lighting and again normal shadow. For this specific tutorial I've arranged these in clockwise order of one another.
Lighting colour (critical to some of my future tests) had the Key light with a cooler colour (a near white blue in this case), the fill with a warmer (near white yellow), and backlight with a neutral (near white gray).
I grouped this three-point lighting system which in effect (with centre point truly in the centre) turned these lights into an imaginary circle (basically bombarding my scene with light from all directions, but of varying power and strengths). For each test of my lighting I rotated this group 45 degrees per render. This way I could see what the three-point lighting was doing from roughly every possible position of setup.
Aug 10, 2011
Ambient Light Test
So welcome one and all to my self imposed challenge to learn and master 3D lighting. While I label this as a tutorial, in reality you are right here beside me as I stumble on things that look good and those that don't.
How I've hoped to make this more helpful for both of us, is by meticulously collecting and cataloguing my results.
So here is my methodology. I'd suggest that you follow my procedure very closely to reproduce any of the results you see here. I'm finding lighting is composed of dozens of variables, and so like a good science experiment I'm isolating each set one at a time to see what they do. So please bare with me as over the next few days (possibly weeks, or worse case scenario months) as I attack each variable on its own.
Here I'm testing a Three-point lighting system. To reverse engineer this setup you're going to need a circular array of three lights (whether they be spotlight, blub, or distant is up to you... though I've personally gone with distant). These lights should be aligned 120 degrees apart from one another, and all pointing towards the centre of the circle. Mine were pointing at the ground from the sky at a 45 degree angle (I will be running a test/tutorial on changing all the angles and positions mentioned here in later experiments).
Once you're lights are setup, each will have their own settings. These include the key light which will have the highest lighting and shadowing rating (in the case of below both these settings were 100%), and thus be the main light source of the scene. Next is the fill light that will have a halved value on lighting intensity, but in my case a normal shadow strength. Lastly the backlight will be the weakest with a 1/3 to 1/4 strength in lighting and again normal shadow. For this specific tutorial I've arranged these in clockwise order of one another.
Lighting colour (critical to some of my future tests) had the Key light with a cooler colour (a near white blue in this case), the fill with a warmer (near white yellow), and backlight with a neutral (near white gray).
I grouped this three-point lighting system which in effect (with centre point truly in the centre) turned these lights into an imaginary circle (basically bombarding my scene with light from all directions, but of varying power and strengths). For each test of my lighting I rotated this group 45 degrees per render. This way I could see what the three-point lighting was doing from roughly every possible position of setup.
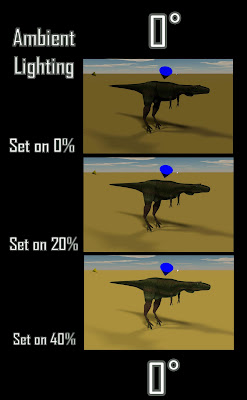
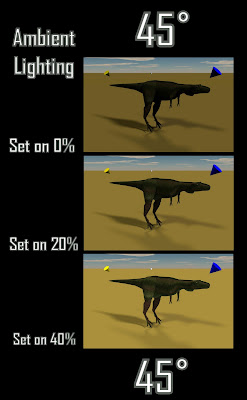
Today's test variable is the ambient lighting within the scene. This is of course a lighting source removed from those I can create or move. I wanted to see what effect normal, zero, or well above average would have on a basic three-point system.
I had a few surprises in the zero and cranked up tests, but normal ambiance proved to be nice and predictable. So I share with you the visual results of my labours. I offer no commentary yet, as this is just one of many tests I plan on running. I'm sure once I've dived into lighting as a whole a bit more I will return with some points and tips, but for now again we're both learning and seeing these together...
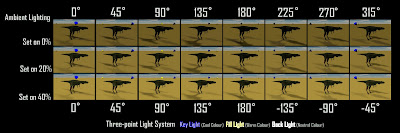 Here are all the results combined (hopefully blogger allows us to click to enlarge it... if not I'll upload it to my flickr account and link it tomorrow). Below I've broken this down by the three-points alignment around the unmoving Dinosaur and camera. The light group starts at my 0 degree mark and goes around full circle from there.
The floating cones you see in these pictures are stand in proxies for the lights themselves so you can see roughly where they are and how I've set them up (as mine are distant lights their exact position isn't important. For bulb or spotlights you will need to change their position to much further away from objects in a scene).
The blue cone is the key light, the yellow is the fill, and the white is the backlight (I choose these colours at the time as they were a visual representation of what colours I'd made the lights themselves, but in later experiments I realized after the fact I stuffed up changing these with my changes in the lights colour... BEEP!)


How I've hoped to make this more helpful for both of us, is by meticulously collecting and cataloguing my results.
So here is my methodology. I'd suggest that you follow my procedure very closely to reproduce any of the results you see here. I'm finding lighting is composed of dozens of variables, and so like a good science experiment I'm isolating each set one at a time to see what they do. So please bare with me as over the next few days (possibly weeks, or worse case scenario months) as I attack each variable on its own.
Here I'm testing a Three-point lighting system. To reverse engineer this setup you're going to need a circular array of three lights (whether they be spotlight, blub, or distant is up to you... though I've personally gone with distant). These lights should be aligned 120 degrees apart from one another, and all pointing towards the centre of the circle. Mine were pointing at the ground from the sky at a 45 degree angle (I will be running a test/tutorial on changing all the angles and positions mentioned here in later experiments).
Once you're lights are setup, each will have their own settings. These include the key light which will have the highest lighting and shadowing rating (in the case of below both these settings were 100%), and thus be the main light source of the scene. Next is the fill light that will have a halved value on lighting intensity, but in my case a normal shadow strength. Lastly the backlight will be the weakest with a 1/3 to 1/4 strength in lighting and again normal shadow. For this specific tutorial I've arranged these in clockwise order of one another.
Lighting colour (critical to some of my future tests) had the Key light with a cooler colour (a near white blue in this case), the fill with a warmer (near white yellow), and backlight with a neutral (near white gray).
I grouped this three-point lighting system which in effect (with centre point truly in the centre) turned these lights into an imaginary circle (basically bombarding my scene with light from all directions, but of varying power and strengths). For each test of my lighting I rotated this group 45 degrees per render. This way I could see what the three-point lighting was doing from roughly every possible position of setup.
Today's test variable is the ambient lighting within the scene. This is of course a lighting source removed from those I can create or move. I wanted to see what effect normal, zero, or well above average would have on a basic three-point system.
I had a few surprises in the zero and cranked up tests, but normal ambiance proved to be nice and predictable. So I share with you the visual results of my labours. I offer no commentary yet, as this is just one of many tests I plan on running. I'm sure once I've dived into lighting as a whole a bit more I will return with some points and tips, but for now again we're both learning and seeing these together...
Here are all the results combined (hopefully blogger allows us to click to enlarge it... if not I'll upload it to my flickr account and link it tomorrow). Below I've broken this down by the three-points alignment around the unmoving Dinosaur and camera. The light group starts at my 0 degree mark and goes around full circle from there.
The floating cones you see in these pictures are stand in proxies for the lights themselves so you can see roughly where they are and how I've set them up (as mine are distant lights their exact position isn't important. For bulb or spotlights you will need to change their position to much further away from objects in a scene).
The blue cone is the key light, the yellow is the fill, and the white is the backlight (I choose these colours at the time as they were a visual representation of what colours I'd made the lights themselves, but in later experiments I realized after the fact I stuffed up changing these with my changes in the lights colour... BEEP!)


Subscribe to:
Posts (Atom)